Transforming your favorite sweater into a stylish cardigan can breathe new life into your wardrobe. Whether you’re looking to customize a piece you love or adapt an old sweater for a new season, knowing how to turn a sweater into a cardigan is a valuable skill. This guide will walk you through the entire process, offering essential tools, tips, and creative ideas to help you achieve a professional-looking result. Let’s dive into the world of DIY fashion and discover how you can effortlessly convert a sweater into a cardigan.
 How to Turn a Sweater into a Cardigan: A Step-by-Step DIY Guide for Beginners
How to turn a sweater into a cardigan? Turning a sweater into a cardigan is simpler than you might think. Follow these steps to create a beautiful, wearable cardigan from an existing sweater.
Gather Your Materials
Before you begin, ensure you have all the necessary materials:
- A sweater you want to convert
- Scissors
- A sewing machine or needle and thread
- Measuring tape
- Pins
- Buttons or other closure options
- A pattern (optional)
Measure and Mark
Start by measuring where you want to open the sweater. Typically, cardigans have an open front that starts from the neckline and extends down to the hem. Use a measuring tape to mark a straight line down the center of the sweater from the neckline to the desired length.
Cut the Sweater
Carefully cut along the marked line. Make sure your cuts are straight to ensure the cardigan front looks neat. If you prefer a different style, such as a V-neck, adjust your cutting line accordingly.
Create Sleeves and Edges
After opening the front, you might need to adjust the sleeves and edges to fit the new cardigan style. This could involve trimming excess fabric or reshaping the sleeves for a more relaxed fit.
Sew the Sides
With the front now open, sew the sides of the sweater. Use a sewing machine for a stronger hold or hand sew if you prefer a more personalized touch. Ensure your stitches are even and secure.
Add Closures
Finally, add buttons, a zipper, or another closure method to the open front of your new cardigan. Position them evenly for a balanced look. Buttonholes can be created with a sewing machine for a professional finish.
Finishing Touches
Once the cardigan is assembled, try it on to check the fit. Make any necessary adjustments, such as hemming the edges or reinforcing seams, to ensure comfort and durability.
Essential Tools & Tips for Transforming a Sweater into a Cardigan Like a Pro
To successfully turn a sweater into a cardigan, having the right tools and knowing some handy tips can make all the difference.
Must-Have Tools
- Sewing Machine: Speeds up the process and ensures strong, even stitches.
- Sharp Scissors: Essential for making clean cuts without fraying.
- Measuring Tape: Accurate measurements are crucial for a good fit.
- Pins and Needles: Keep your fabric in place while sewing.
- Thread: Choose a color that matches your sweater for seamless stitching.
- Buttons or Zippers: Select closures that complement your cardigan’s style.
Pro Tips
- Choose the Right Sweater: Opt for a sweater with a slightly loose fit to allow for adjustments during the conversion.
- Mark Before Cutting: Use chalk or fabric markers to outline your cuts. This helps maintain symmetry.
- Practice Sewing Stitches: If you’re new to sewing, practice on scrap fabric to get comfortable with your machine.
- Reinforce Seams: Double stitch high-stress areas like the sides and closures to ensure longevity.
- Press Your Seams: Ironing your seams before and after sewing can make your cardigan look more polished.
 How to Choose the Perfect Sweater for DIY Cardigan Conversion
Selecting the right sweater is the first step in successfully turning a sweater into a cardigan. Here’s how to choose the perfect one for your DIY project.
Consider the Fabric
Choose a sweater made from a fabric that is easy to work with, such as cotton or lightweight wool. Heavier fabrics like chunky knits can be more challenging to sew and may require a stronger sewing machine.
Evaluate the Fit
A sweater with a slightly loose fit is ideal for conversion. It allows room for adjustments without making the finished cardigan too tight. Ensure there’s enough fabric to extend the length and width as needed.
Assess the Style
Look for sweaters with simple designs. Complex patterns or embellishments can complicate the conversion process. Solid colors are easier to work with and offer more styling flexibility for your new cardigan.
Check for Wear and Tear
Select a sweater in good condition. Avoid pieces with holes, excessive stretching, or fading, as these issues can affect the quality of your finished cardigan.
Match Your Wardrobe
Choose a sweater that complements your existing wardrobe. A neutral color like black, gray, or white can be easily styled with various outfits, while a bold color or unique pattern can make your cardigan a statement piece.
Styling Hacks: How to Wear Your DIY Sweater-Cardigan for Any Occasion
Once you’ve transformed your sweater into a cardigan, it’s time to style it for different occasions. Here are some creative ideas to make your new cardigan a versatile addition to your wardrobe.
Casual Day Out
Pair your DIY cardigan with jeans and a simple t-shirt for a relaxed, everyday look. Add sneakers or flats to keep it comfortable and practical. This combination is perfect for running errands, meeting friends, or enjoying a casual day out.
Office Ready
Elevate your work attire by layering your cardigan over a blouse or a button-down shirt. Pair it with tailored pants or a pencil skirt for a professional appearance. Opt for neutral colors or subtle patterns to maintain a polished and sophisticated look.
Evening Elegance
For a more formal occasion, style your cardigan with a sleek dress or a tailored jumpsuit. Add statement jewelry and heels to enhance the elegance of your outfit. This combination is perfect for dinners, parties, or evening events.
Weekend Brunch
Create a chic brunch outfit by wearing your cardigan over a flowy dress or a skirt and a fitted top. Accessorize with ankle boots or stylish sandals and a crossbody bag to complete the look. This ensemble is both trendy and comfortable, ideal for a leisurely weekend outing.
Travel Comfort
A long, cozy cardigan is perfect for travel. Layer it over a comfortable outfit, such as leggings and a tunic or a simple dress. Add a scarf and comfortable shoes for a practical and stylish travel look that keeps you warm and relaxed during your journey.
Seasonal Adaptations
Adapt your cardigan for different seasons by pairing it with appropriate clothing. In spring, wear it over lightweight tops and skirts. During autumn and winter, layer it with thicker fabrics and accessories like scarves and boots to stay warm and stylish.
FAQ: Common Questions About Turning Sweaters into Cardigans Answered
Turning a sweater into a cardigan can raise several questions. Here are answers to some common queries to help you through the process.
Can I Convert Any Sweater into a Cardigan?
Most sweaters can be converted into cardigans, but some are easier than others. Sweaters with a simple design and a slightly loose fit are ideal candidates. Highly embellished or heavily patterned sweaters might be more challenging to work with.
What Tools Do I Need for the Conversion?
You’ll need basic sewing tools, including a sewing machine, scissors, measuring tape, pins, needles, thread, and buttons or zippers. Having these tools on hand will make the conversion process smoother and more efficient.
How Long Does It Take to Turn a Sweater into a Cardigan?
The time required depends on your sewing experience and the complexity of the project. On average, it can take anywhere from a few hours to an entire day to complete the conversion. Take your time to ensure each step is done correctly.
Do I Need to Sew Both Sides of the Sweater?
Yes, sewing both sides of the sweater after opening the front is essential to create a balanced and wearable cardigan. Ensure that the seams are even and secure for a professional finish.
Can I Add Pockets to My DIY Cardigan?
Absolutely! Adding pockets can enhance the functionality and style of your cardigan. You can sew pockets onto the sides or front of the cardigan to create a more practical and trendy piece.
Is It Possible to Convert a Thick Sweater into a Lightweight Cardigan?
Yes, you can convert a thick sweater into a more lightweight cardigan by carefully trimming excess fabric and adjusting the fit. However, be mindful that altering the thickness too much might affect the overall structure and comfort of the cardigan.
 Seasonal Styling: How to Turn a Sweater into a Cardigan for Spring/Summer Wear
Adapting your DIY cardigan for warmer seasons can extend its versatility. Here’s how to modify and style your cardigan for spring and summer.
Choose a Lightweight Fabric
For spring and summer, opt for sweaters made from lighter fabrics like cotton or linen blends. These materials are breathable and comfortable in warmer weather, ensuring that your cardigan remains a stylish layering piece without causing discomfort.
Shorten the Length
Consider shortening the length of your cardigan to make it more suitable for warmer weather. A cropped or mid-length cardigan pairs well with summer outfits and adds a trendy touch without overheating.
Opt for Open-Front Styles
Open-front cardigans with minimal or no buttons are ideal for spring and summer. They allow for better airflow and can be easily layered over tank tops, camisoles, or lightweight blouses.
Add Colorful Accents
Brighten up your cardigan for the warmer months by adding colorful buttons, embroidery, or trims. These accents can make your cardigan more vibrant and in line with spring and summer trends.
Pair with Light Fabrics
Style your cardigan with lightweight fabrics to keep cool. Wear it over sundresses, shorts, or skirts made from breathable materials. This combination ensures comfort while maintaining a stylish appearance.
Styling Ideas for Spring and Summer
- Sundress Companion: Layer your lightweight cardigan over a floral sundress. Add sandals and a sunhat for a fresh, summery look.
- Shorts and Tank Tops: Pair a cropped cardigan with high-waisted shorts and a fitted tank top. Complete the outfit with sneakers or flats for a casual, chic vibe.
- Linen Blouses: Wear your cardigan over a linen blouse and tailored pants for a sophisticated yet breezy ensemble suitable for both work and leisure.
- Bohemian Flair: Add fringe or tassel details to your cardigan, then wear it with a flowy maxi dress and ankle boots for a bohemian-inspired outfit perfect for spring festivals or summer gatherings.
No-Sew Methods to Transform a Sweater into a Cardigan Quickly
If you’re not comfortable with sewing or need a quick transformation, no-sew methods offer an easy alternative to turn a sweater into a cardigan.
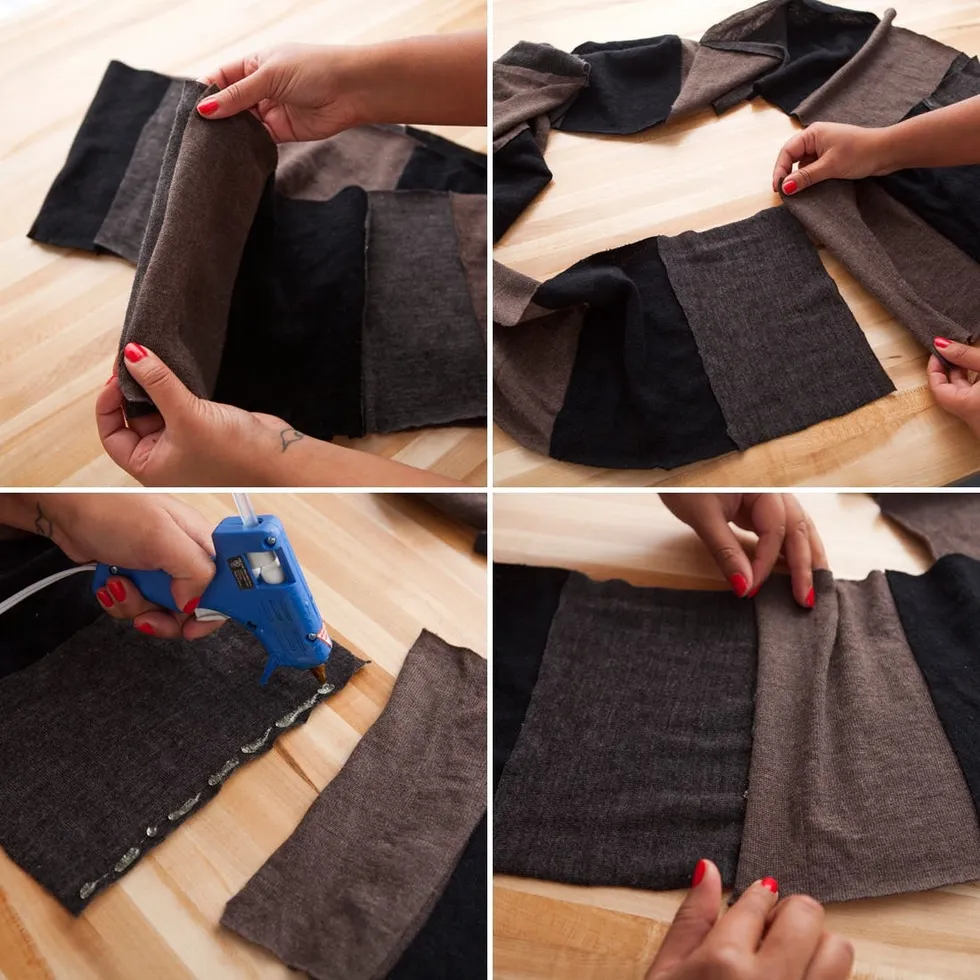
Use Fabric Glue or Fusible Tape
Fabric glue and fusible tape are excellent tools for binding seams without the need for sewing. Here’s how to use them:
- Mark the Opening: Decide where you want to open the sweater and mark the line accordingly.
- Apply Fabric Glue or Tape: Apply fabric glue or fuse the tape along the marked line to create the open front. Ensure the glue or tape is evenly applied for a smooth finish.
- Press and Seal: Press the fabric together firmly and allow it to dry completely. This method provides a strong bond without the mess of sewing thread.
Tie or Knot Method
Transforming your sweater into a cardigan can also be achieved by creating ties or knots at the front. This method is particularly useful for achieving an adjustable and stylish closure.
- Cut the Front Opening: Carefully cut along the center front of the sweater.
- Create Straps: Leave long enough straps on both sides to tie at the waist or neckline.
- Add Knots or Bows: Tie the straps into knots or bows for a decorative and functional closure. This method adds a fashionable element while providing an adjustable fit.
Elastic Bands for a Fitted Look
Elastic bands can be used to cinch the edges of your newly created cardigan front, offering a fitted and stylish finish.
- Measure and Cut Elastic: Measure the length needed to fit around your neckline or waist and cut the elastic accordingly.
- Attach Elastic Bands: Sew or glue the elastic bands to the edges of the cardigan front. Ensure the bands are securely attached to prevent slipping.
- Adjust for Fit: Adjust the tightness of the elastic to achieve your desired fit, ensuring comfort and style.
Decorative Closures without Sewing
Enhance your cardigan by adding decorative closures such as snaps, hooks, or decorative ties without sewing.
- Choose Decorative Fasteners: Select stylish snaps or hooks that match the color and style of your sweater.
- Attach Fasteners Securely: Use fabric glue to attach the fasteners to the cardigan front. Hold them in place until the glue dries completely.
- Incorporate Creative Elements: Add ribbons, beads, or charms to the fasteners for a personalized and unique touch.
 How to Maintain Your DIY Cardigan After Turning a Sweater
Proper maintenance ensures that your DIY cardigan remains in excellent condition. Follow these tips to keep your transformed sweater looking its best.
Washing Instructions
- Hand Wash Recommended: Hand washing is gentler on the fabric and helps maintain the shape and integrity of your cardigan.
- Use Mild Detergent: Choose a mild detergent to prevent damage to the fabric. Avoid harsh chemicals that can weaken seams and colors.
- Avoid Soaking: Do not soak your cardigan for extended periods. Gently agitate the water to clean without stressing the fabric.
Drying Techniques
- Air Dry: Lay your cardigan flat on a clean towel to air dry. This prevents stretching and helps maintain the cardigan’s shape.
- Avoid Direct Sunlight: Dry your cardigan in a shaded area to prevent colors from fading. Direct sunlight can weaken fibers and alter colors over time.
- Reshape While Drying: Gently reshape your cardigan while it is still damp to ensure it dries evenly and retains its intended form.
Storing Your Cardigan
- Fold, Don’t Hang: Fold your cardigan neatly instead of hanging it to prevent stretching and distortion of the fabric.
- Use Lavender Sachets: Place lavender sachets or cedar blocks in your storage area to repel moths and maintain freshness.
- Avoid Overcrowding: Store your cardigan in a designated space where it won’t be squashed by other garments. Proper storage helps preserve its shape and quality.
Repairing Minor Damage
- Quick Repairs: Address small issues like loose threads or minor holes immediately to prevent further damage.
- Use Fabric Patches: Apply fabric patches to reinforce areas that experience regular wear and tear, such as the elbows or sides.
- Sewing Kits Handy: Keep a small sewing kit on hand to make quick fixes and keep your cardigan looking pristine.
Refreshing the Fabric
- Steam Cleaning: Use a steamer to remove wrinkles and freshen up the fabric without risking damage from a high-heat dryer.
- Fabric Refreshers: Lightly spray fabric refreshers to eliminate odors and keep your cardigan smelling fresh between washes.
- Storage Bag: Use breathable fabric storage bags to protect your cardigan from dust and moisture when not in use.
 Conclusion: How to Turn a Sweater into a Cardigan and Elevate Your Wardrobe
Learning how to turn a sweater into a cardigan opens up a world of creative possibilities, allowing you to customize your wardrobe to fit your unique style. By following this comprehensive guide, you can transform an ordinary sweater into a versatile cardigan that suits any occasion or season. From selecting the perfect sweater and essential tools to implementing no-sew methods and maintaining your DIY creation, each step is designed to ensure a successful and enjoyable transformation process. Embrace the art of DIY fashion and enjoy the satisfaction of wearing a cardigan crafted by your own hands, reflecting your personal taste and creativity.